Building a weather station on a RaspberryPi
This project has the purpose to build a weather station with several monitoring sensors send the data in cloud and monitor the data from any device. The POC is using only a light and a temperature sensor but it can be extended to any number of sensors like: humidity, wind speed and so on.
KEYWORDS
- Python 2.x
- RaspberryPi
- Microsoft AZURE
- IoT hub
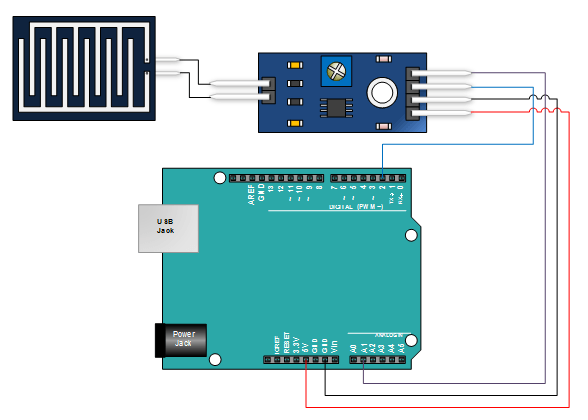
To build a weather station you'll need a RaspberryPi(with SD, OS installed..), a number of sensors(light intensity, temperature, humidity...), a sensor schield(analog to digital convertor and signal multiplexor), connection cables(all types: father-father, mother-mother, father-mother..) and a breadbord(for powering up multiple sensors). I used this setup with this breadbord
STEP 1. Connecting the sensors.
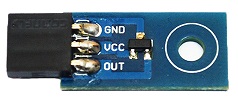
I have a temperature and a light intensity sensor:
 Temperature sensor
 Light intensity sensor
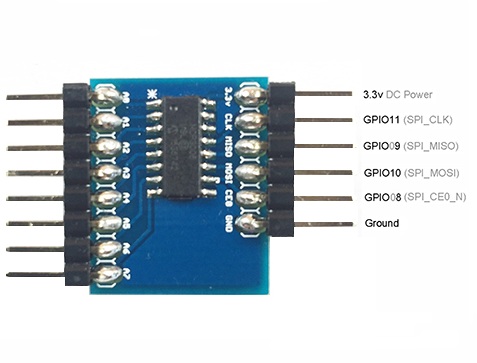 SensorSchield
(GND sensor -> GND RaspberryPi(or Breadboard))
(VCC sensor -> 3.3V from RaspberryPi(or Breadboard))
(OUT sensor -> one of V0 - V7 SensorSchield)
STEP 2.Programming the sensors.
For programming the sensors I used spidev library. If you don't have it you can take it from here . I wrote the following code to get the data from the sensors:
import spidev
import time

spi = spidev.SpiDev()
spi.open(0,0)

def readadc(adcum):
	if (adcum > 7) or (adcum < 0):#analog identifier out of bounds
		return -1
	r = spi.xfer2([1, 8+adcum<<4, 0])
	adcout = ((r[1]%3 << 8) + r[2])
	return adcout

msgCount = 0
while(msgCount < 10):
	lightVal = readadc(0)#0 connects light sensor, 1 connects temperature sensor
	voltageVal = readadc(1) * 3.3/1024
	tempCelsius = (voltageVal - 0.5) * 100

	print "Temperature(celsius):", tempCelsius
	print "Light val:", lightVal
	time.sleep(1)
The code is intended to loop 10 times and display data from sensor on every second.
The output will look like:
Temperature(celsius): 27.021484375
Light val: 234
.....
STEP 3. Format the data and prepare for sending it to cloud.
use json standard library for packing the data in a json format.
import json
print json.dumps({'Temperature': tempCelsius, 'LightIntensity': lightVal}, sort_keys=True, indent=4, separators=(',', ': '))
STEP 4. Build the Iot hub client and setup the AZURE server.
To send the data in cloud I used a AZURE server with an IoT Hub that will act like a data broker.
Microsoft offers a MQTT/HTTP clinet for communicating with the AZURE server for Python.
You need to build this client on you local machine.
- Building the AZURE IoT client for Python in Raspbian.
Using Git I cloned the repository:
git clone --recursive https://github.com/Azure/azure-iot-sdk-python.git
On a terminal, navigate to: 'azure-iot-sdks\python\build_all\linux\' and run:
./setup.sh #to install all dependencies
After a succesful build the library will be found on: 'azure-iot-sdk-python\device\samples\iothub_client.so'
./build.sh #will build all necessary C libraries
- In case you don't have a test server you can create a trial one from here
Follow the steps there so you can create an AZURE IoT server. You will need to create also a device ID and register that device. Follow closely the steps there and everything will be setup and ready to go.
STEP 5. First test run and solving known issues with the IoT client
To make a simple test to see if eveyrthing is setup and ready to run you can test-run a sample like 'azure-iot-sdks\python\device\samples\iothub_client_sample.py'.Before running you need to set the connection string to match your credentials.
If it runs ok, than everything is set-up and ready to rumble. If not, than there might be some problems. The ones that I encounter:
-
Communication restrictions on port 8883(MQTT port).
The error looks like this:
Error: Time:Fri Dec 9 15:56:23 2016 File:E:\20160826release\azure-iot-sdks\c\azure-umqtt-c\src\mqtt_client.c Func:_mqtt_client_connect Line:692 Error: io_open failed
Error: Time:Fri Dec 9 15:56:23 2016 File:c:\repos\azure-iot-sdks\c\iothub_client\src\iothubtransportmqtt.c Func:_SendMqttConnectMsg Line:694 failure connecting to address IoT-<...>.azure-devices.net:8883.
To fix it create ongoing/outgoing port permissions for TCP 8883 port. -
You can also encounter a Authorization issue.
The error looks like this:
Error: Time:Tue Jan 10 02:21:26 2017 File:/home/pi/azure-iot-sdks/c/iothub_client/src/iothubtransport_mqtt_common.c Func:mqtt_operation_complete_callback Line:951 Connection Not Accepted: 0x5: Not Authorized
Error: Time:Tue Jan 10 02:21:26 2017 File:/home/pi/azure-iot-sdks/c/c-utility/src/tlsio_openssl.c Func:decode_ssl_received_bytes Line:654 SSL channel closed in decode_ssl_received_bytes.
Error: Time:Tue Jan 10 02:21:26 2017 File:/home/pi/azure-iot-sdks/c/c-utility/src/tlsio_openssl.c Func:on_underlying_io_bytes_received Line:709 Error in decode_ssl_received_bytes.
To fix it try different fixes:-
Set the correct time for the RaspberryPi:
sudo date --set "20 jan 2017 15:00:00"
This should solve your issue. In case the error persists, -
Try "pinging" the server with on MQTT port:
openssl s_client -connect
Verify return code: 0 (ok) - should be OK.azure-devices.net:8883 -debug -msg -
Check validity of the certificate:
The client uses Baltimore_CyberTrust_Root.pem for the handshake so, you can try to see if yours exists and it's OK
openssl x509 -in /usr/lib/ssl/certs/Baltimore_CyberTrust_Root.pem -text
You can see there validity period:
Validity
Not Before: May 12 18:46:00 2000 GMT
Not After : May 12 23:59:00 2025 GMT
NOTE: Your device should be in the validity period -
If nothing worked, create a tcp dump so you can see what's actually happening on the network.
tcpdump -w capture.pcap
this will create capture.pcap on home/pi
Copy it on windows:
sudo chmod a+rw capture.pcap
open it with wireshark on a Windows machine
rename the file because pcap is not seen
ftp copy it to windows
- Re-install certificates. sudo apt-get install ca-certificates
-
Set the correct time for the RaspberryPi:
If the application runs smooth you should have some output like:
.....
IoTHubClient.send_event_async accepted message [0] for transmission to IoT Hub.
......
Confirmation[0] received for message with result = OK
STEP 6. Unify the code.
Unify the code for programming the sensors and the IoT hub client.
import time
import sys
import spidev
import iothub_client
import json

from datetime import datetime
from iothub_client import *

message_timeout = 10000

# global counters
receive_callbacks = 0
send_callbacks = 0

protocol = IoTHubTransportProvider.MQTT
connection_string = "HostName=;DeviceId=;SharedAccessKey="

spi = spidev.SpiDev()
spi.open(0,0)

def readadc(adcum):
	if (adcum > 7) or (adcum < 0):
		return -1
	r = spi.xfer2([1, 8+adcum<<4, 0])
	adcout = ((r[1]%3 << 8) + r[2])
	return adcout

class HubManager(object):

	def __init__(self):
		self.client = IoTHubClient(connection_string, protocol)
		# set the time until a message times out
		self.client.set_option("messageTimeout", message_timeout)
		self.client.set_message_callback(self._receive_message_callback, receive_context)

	def _receive_message_callback(self, message, counter):
		global receive_callbacks
		buffer = message.get_bytearray()
		size = len(buffer)
		print("Received Message [%d]:" % counter)
		print("    Data: <\%s> & Size=\%d" %
			  (buffer[:size].decode('utf-8'), size))
		map_properties = message.properties()
		key_value_pair = map_properties.get_internals()
		print("    Properties: %s" % key_value_pair)
		counter += 1
		receive_callbacks += 1
		print("    Total calls received: %d" % receive_callbacks)
		return IoTHubMessageDispositionResult.ACCEPTED

	def _send_confirmation_callback(self, message, result, user_context):
		global send_callbacks
		print "Confirmarion:", datetime.now()
		print(
			"Confirmation[%d] received for message with result = %s" %
			(user_context, result))
		map_properties = message.properties()
		key_value_pair = map_properties.get_internals()
		print("    Properties: %s" % key_value_pair)
		send_callbacks += 1
		print("    Total calls confirmed: %d" % send_callbacks)


	def send_event(self, event, properties, send_context):
		if not isinstance(event, IoTHubMessage):
			event = IoTHubMessage(bytearray(event, 'utf8'))

		if len(properties) > 0:
			prop_map = event.properties()
			for key in properties:
				prop_map.add_or_update(key, properties[key])

		self.client.send_event_async(
			event, self._send_confirmation_callback, send_context)


if __name__ == '__main__':
	print("\nPython %s" % sys.version)
	print("IoT Hub for Python SDK Version: %s" % iothub_client.__version__)
	print("Starting the IoT Hub Python sample...")
	print("    Protocol %s" % protocol)
	print("    Connection string=%s" % connection_string)

	try:
		hub_manager = HubManager()

		msgCount = 0
		while msgCount < 2:
			lightVal = readadc(0)

			voltageVal = readadc(1) * 3.3 /1024
			tempCelsius = (voltageVal - 0.5) * 100

			print "Celsius:", tempCelsius
			print "VoltageVal:", lightVal
			currentTime = datetime.now()
			strDate = "%s-%s-%s %s:%s" %(str(currentTime.year), str(currentTime.month), str(currentTime.day), str(currentTime.hour), str(currentTime.minute))
			jsonMsg = json.dumps({'Time': strDate, 'Temperature': tempCelsius, 'LightIntensity': lightVal}, sort_keys=True, indent=4, separators=(',', ': '))

			msg_properties = {
					"Property": "MsgId_%d" %msgCount
				}
			print jsonMsg
			hub_manager.send_event(jsonMsg, msg_properties, msgCount)
			msgCount += 1
			time.sleep(60)

	except IoTHubError as e:
		print("Unexpected error %s from IoTHub" % e)
	except KeyboardInterrupt:
		print("IoTHubClient sample stopped")
					{

						"LightIntensity": 292,

						"Temperature": 28.310546874999996,

						"Time": "2017-3-2 16:40"

					}

					Confirmarion: 2017-03-02 16:40:14.026844

					Confirmation[0] received for message with result = OK

						Properties: {'Property': 'MsgId_0'}

						Total calls confirmed: 1
STEP 7. Check out the data in cloud.
You can create the monitoring application in any technology that supports communication on mqtt/http protocol.
There are many applications already created, so there is no need to post one here, you can implement one in no time just follow
this link that has implementation for .NET, Node.js or plain Java.
Good luck on creating your own weather station.
Get Started
If you need some guidance in engineering field or you're seeking for some help don't hesitate to write me.