Setup a WiFi-direct® network
Scenarios covered by 'Wi-Fi direct':
- You can transfer data between devices without internet connection, router or any other connection type.
- You can stream media, send a presentation or display a file on a button press
- You can create a secure private network with DHCP server included
KEYWORDS
- RaspberryPi
- Wi-Fi Direct®
- P2P GO mode

Wi-Fi CERTIFIED Wi-Fi Direct® is a certification mark for devices supporting a technology that enables Wi-Fi devices to connect directly,
making it simple and convenient to do things like print, share, sync and display.
Products bearing the Wi-Fi Direct certification mark can connect to one another without joining a traditional home, office or hotspot network.
System setup: RaspberryPi 3 Model B Plus Rev 1.3
OS: 2018-11-13-raspbian-stretch-full.imgs
RaspberryPi setup(server)
1. configure wpa_supplicant service to setup a 'Wi-Fi direct' server. edit wpa_supplicant.configI'll use WPA supplicant service for network setup. It's a network service supporting WEP, WPA and WPA2; It implements key negotiation with a WPA authenticator and it controls the roaming and IEEE 802.11 authentication/association of the wireless driver.
$ sudo nano /etc/wpa_supplicant/wpa_supplicant.conf
ctrl_interface=DIR=/var/run/wpa_supplicant GROUP=netdev
update_config=1
country=US

ap_scan=1
device_name=RPi_3_1
device_type=1-0050F204-1
driver_param=use_p2p_group_interface=1
driver_param=p2p_device=1
#log/debug settings
p2p_listen_reg_class=81
p2p_listen_channel=1
p2p_oper_reg_class=81
p2p_oper_channel=1
#
p2p_go_intent=1
p2p_go_ht40=1
2. kill wpa_supplicant service if it's already started.
$ sudo killall wpa_supplicant
$ sudo rm /var/run/wpa_supplicant/wlan0
$ sudo wpa_supplicant -B -i wlan0 -D nl80211 -c /etc/wpa_supplicant/wpa_supplicant.conf
$ reboot
IF the service started with success you can enter the console mode.
5. enter wpa_console:
$ sudo wpa_cli -i wlan0
We'll use command line interface for AP related commands
> p2p_group_add
this should generate a log with some data regarding the created access point.
in case it worked fine, it will also create a new interface named p2p-wlan0-0
if the group is created sucessfully nothing is returned besides OK and specifications of the AP.
if the group is not created, a error message with some reason will be returned
we can delete the group created with the command: p2p_group_remove p2p-wlan0-0
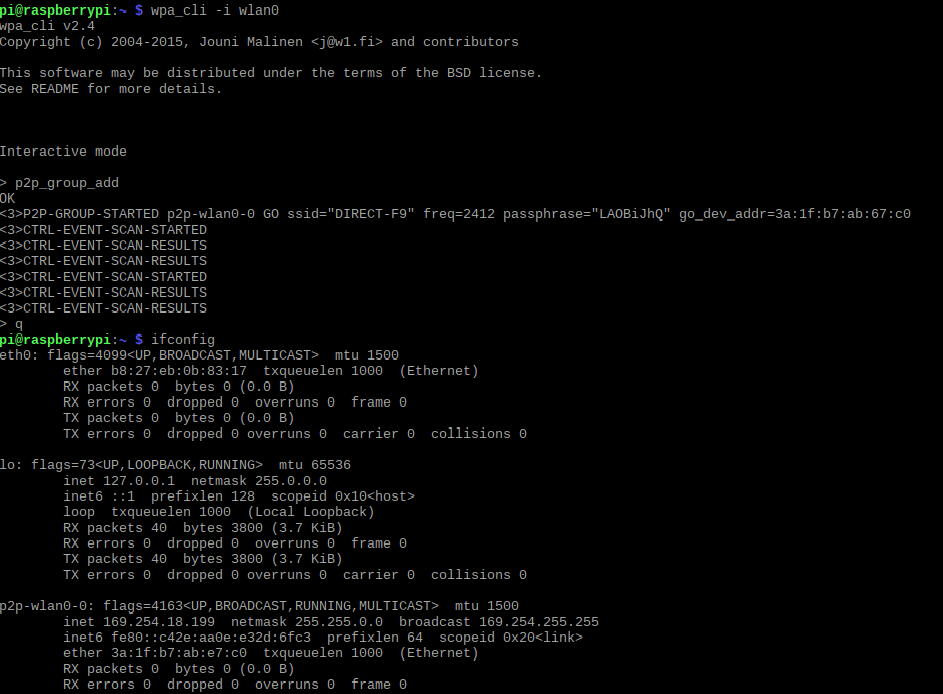 AP creation. p2p-wlan0-0 interface created OK
7. for external connection/media transfer you need to generate a pin on the new interface
$ wpa_cli -i p2p-wlan0-0
> wps_pin any
> wps_pin any 1234
this pin is generated in case you need to send media to the device
For the permanent connection you need the SSID generated, in this case we have:
SSID:'DIRECT-F9' with the pass: 'LA0BiJhQ'
Client setup - the second RPi
Now, we want to connect to this WiFi-direct's AP another RaspberryPi# enter wpa_supplicant console for interface wlan0
$ sudo wpa_cli -i wlan0
> p2p_connect < hw_address_for_p2p-wlan0-0 of the RPi1 > <pin created, in this case 1234> join
p2p_remove_client <hw_address_for_p2p-wlan0-0 of the RPi1>
We need to check if we have a p2p-wlan0-0 interface created and with IP
client joining AP. p2p-wlan0-0 interface created OK
$ sudo arp -a
Get Started
If you need some guidance in engineering field or you're seeking for some help don't hesitate to write me.